Premiere Pro Workflows
This article is a place to describe Premiere Pro workflows in detail. We only use Premiere Pro for editing if a tape has to be transferred in chunks. However, since Premiere Pro is not optimized for working with archival footage we need to make some tweaks before it’ll create files that work well for our clients and our QC.
For now these workflows work with Version 15 and later. Earlier versions DO NOT WORK.
Fixing SD Files
Premiere Pro doesn’t properly export SD files. If you create an SD file of ANY TYPE you need to make sure to run the fix_adobe.sh script on the file. You can run it by dragging in the script (it lives in the Scripts folder on the SAN) and then dragging in the files.
Working with 4-Channel SD Files
Adobe has very strange problems working with 4 Channel files. We’ve tried making it a bit easier by making a template project and presets. This article will describe using the templates and presets, as well as doing everything by scratch (in case the templates and presets are unavailable)
Using Template and Presets
- Start by opening the file 4ChannelSDEditing.prproj. It lives on the SAN here: /Volumes/SymplyUltra/Software/Adobe Premiere/4ChannelSDEditing.prproj
- Save the project as a new file so the Template isn’t disturbed. File -> Save As… (good to name after the BAVC barcode of the file being edited)
- This should open an empty project with a single Timeline in it named 4 Channel Sequence
- Drag your desired 4 channel file into the sequence.
- You’ll know things are working if two audio tracks appear under the video track.
-
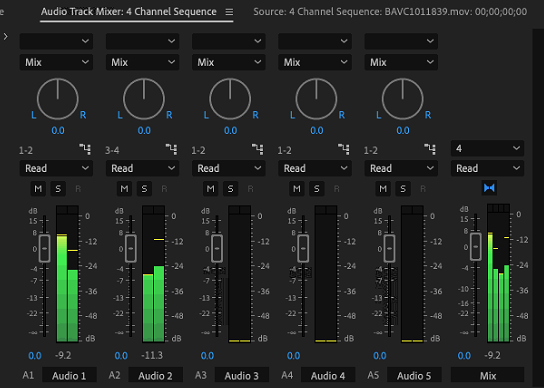
You can verify that these are two stereo tracks by clicking the Audio tab at the top of the main Premiere window. In here you can see the monitoring for all the audio. Each individual track should be stereo, and the Mix channel should have four tracks in it. See the image below:

- Once you’ve completed your edits, go to File -> Export -> Media…
- Select the following options:
- Format: QuickTime
- Preset: 10 Bit Uncompressed (4 Channel)
-
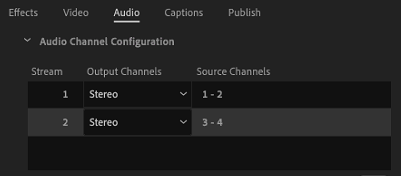
Confirm the audio configuration is correct by opening the audio tab and looking here. You should see two stereo channels (see image)

- Name the output file and start the export. You’re done!
Doing everything from scratch
You should only do this if the templates and presets go missing or are broken:
- Open Premiere Pro and create a new project (good to name after the BAVC barcode of the file being edited)
- Press File -> New -> Sequence…
- From here you can adjust the settings of your new sequence
- In the Sequence Settings you can pick a preset setting. However, none of the available settings will match SD video properly, so you can ignore this part for now
- Click to the Tracks tab
- Select the following settings (THIS IS SO IMPORTANT)
- Mix: Multichannel
- Number of Channels: 4
- You can add and remove as many of the Tracks as you’d like, but you’ll need at least 2 “Standard” or 2 “Stereo” tracks for it to work. I suggest leaving it be.
- Name your sequence (option) and hit OK to create the sequence.
- From here, you can now drag your desired 4 channel file into the sequence.
- (Sometimes it works better to drag the file into the Media Browser first, then into the Sequence)
- When you drag in the file you will get a warning that clip does not match the sequence settings. You MUST click Change Sequence Settings. This will conform the video settings to SD properly.
- You’ll know things are working if two audio tracks appear under the video track.
-
You can verify that these are two stereo tracks by clicking the Audio tab at the top of the main Premiere window. In here you can see the monitoring for all the audio. Each individual track should be stereo, and the Mix channel should have four tracks in it. See the image below:

- Once you’ve completed your edits, go to File -> Export -> Media…
- Select the following options:
- Format: QuickTime
- Click on the Video tab and select the following options:
- Video Codec: Uncompressed YUV 10 bit 4:2:2
- Click on the Audio tab and select the following option
- Sample Rate: 48000 kHz
- Sample Size: 24 bit
- Scroll further down to the Audio Channel Configuration section
- By default you will likely see just 1 stream. A Stereo stream with source channels 1 - 2
- Click the plus sign (+) at the bottom to add a second stream
- Make the new stream a Stereo stream with source channels 3 - 4 (see image)

- Name the output file and start the export. You’re done!